圖像理解

您可以使用 Gemma 3 及更新版本模型來分析與理解圖像內容。這項功能包含描述圖像內容、辨識物件、識別場景,甚至從視覺資訊推論上下文等任務。
以下是展示這些功能的幾個範例。
安裝 Python 套件
安裝執行 Gemma 模型與發出請求所需的 Hugging Face 函式庫。
# Install PyTorch & other libraries
pip install torch accelerate

# Install the transformers library
pip install "transformers>=5.10.1"
載入模型
使用 transformers 函式庫載入管線(pipeline)
MODEL_ID = "google/gemma-4-E2B-it"

from transformers import pipeline

vqa_pipe = pipeline(
    task="image-text-to-text",
    model=MODEL_ID,
    device_map="auto",
    dtype="auto"
)
使用提示範本
以下範例示範如何提供一張圖像並針對其提問。
from PIL import Image
from IPython.display import display
import requests

from transformers import GenerationConfig
config = GenerationConfig.from_pretrained(MODEL_ID)
config.max_new_tokens = 512
gen_kwargs = dict(generation_config=config)

img_url = "https://raw.githubusercontent.com/google-gemma/cookbook/refs/heads/main/apps/sample-data/GoldenGate.png"
input_image = Image.open(requests.get(img_url, stream=True).raw)
display(input_image)

messages = [
    {
        "role": "user", "content": [
            {"type": "image", "url": img_url},
            {"type": "text", "text": "What is shown in this image?"}
        ]
    }
]

output = vqa_pipe(messages, return_full_text=False, generate_kwargs=gen_kwargs)
print(output[0]['generated_text'])
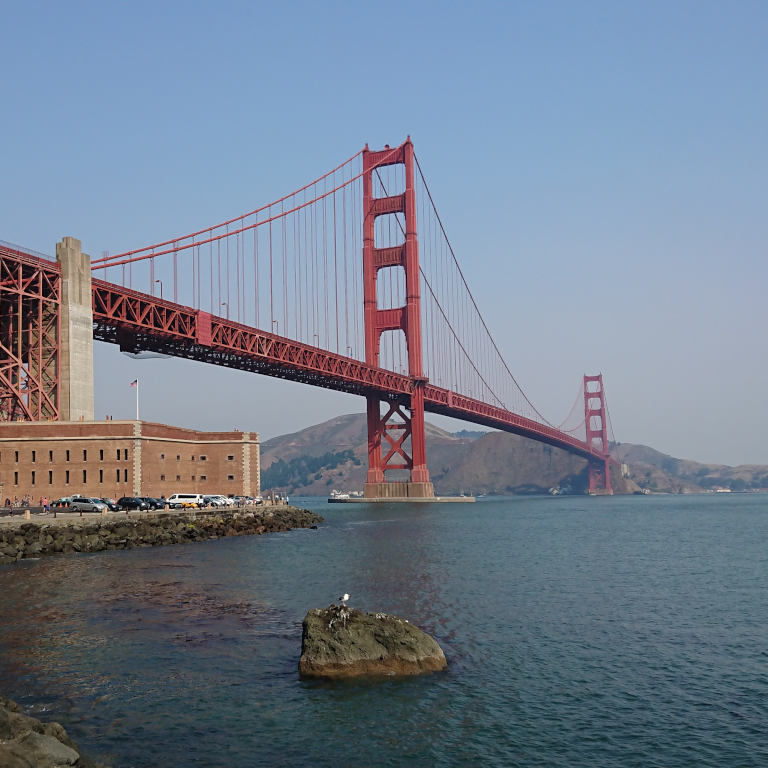
This image shows the **Golden Gate Bridge** in San Francisco, California.

Key elements visible in the picture include:

* **The Golden Gate Bridge:** The iconic red suspension bridge spanning a body of water.
* **The Water:** A large expanse of water (likely the San Francisco Bay or the Pacific Ocean).
* **A Rocky Outcrop/Island:** In the foreground, there is a dark, rocky formation or small island in the water with a white bird perched on it.
* **Hills/Landmass:** In the background, there are hills or mountains on the far shore.
* **Clear Sky:** The sky is clear and bright blue, suggesting fair weather.

It's a scenic photograph capturing the bridge and the coastal environment.<turn|>
使用多張圖像進行提示
您可以在提示範本中加入多個圖像內容,於單一提示中提供多張圖像。
from PIL import Image
from IPython.display import display
import requests

from transformers import GenerationConfig
config = GenerationConfig.from_pretrained(MODEL_ID)
config.max_new_tokens = 512
gen_kwargs = dict(generation_config=config)

img_urls = [
    "https://ai.google.dev/gemma/docs/capabilities/vision/images/surprise.png",
    "https://ai.google.dev/gemma/docs/capabilities/vision/images/kitchen.jpg",
]
for img in img_urls:
    display(Image.open(requests.get(img, stream=True).raw))

messages = [
    {
        "role": "user", "content": [
            {"type": "image", "url": img_urls[0]},
            {"type": "image", "url": img_urls[1]},
            {"type": "text", "text": "Caption these images."}
        ]
    }
]

output = vqa_pipe(messages, return_full_text=False, generate_kwargs=gen_kwargs)
print(output[0]['generated_text'])
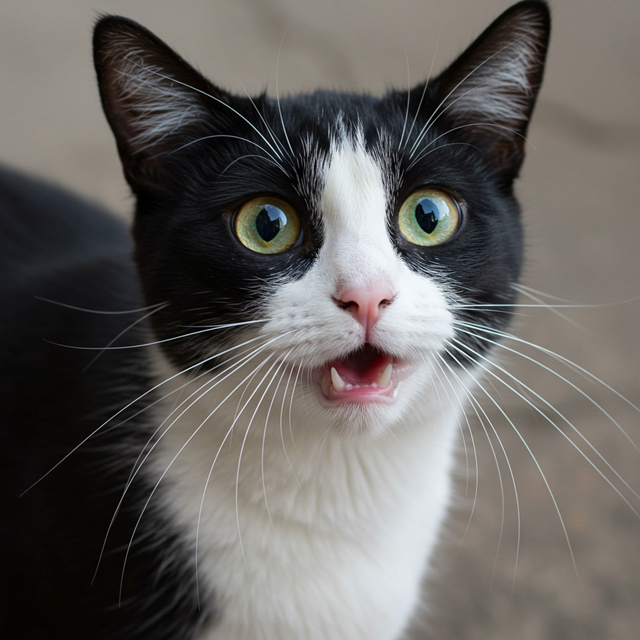
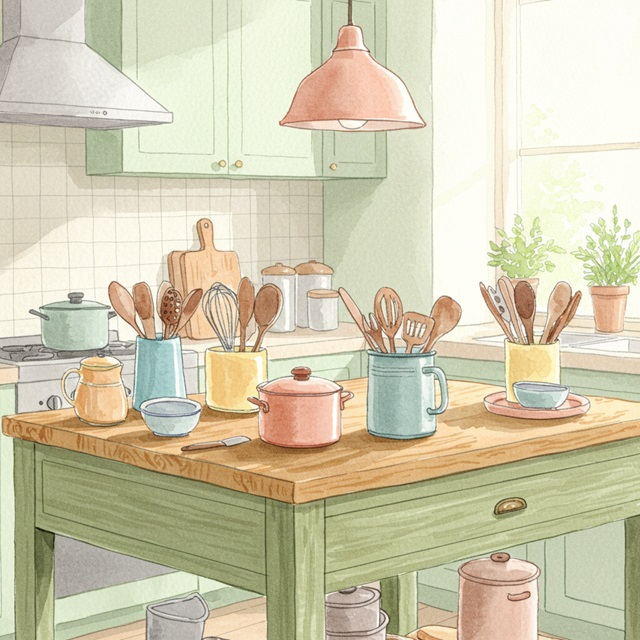
Here are captions for the two images you provided:

**Image 1: Black and White Cat**

**Short & Sweet:**

* Pure elegance.
* Mischief in black and white.
* Those emerald eyes.
* A portrait of feline charm.

**Descriptive & Engaging:**

* The captivating gaze of a beautiful tuxedo cat.
* Alert, curious, and utterly stunning.
* When your cat has that perfectly intense expression.
* Black, white, and mesmerizing green eyes.

**Funny/Playful:**

* Plotting world domination, one glance at a time.
* Judging your life choices.
* Warning: May cause extreme cuteness overload.

**Hashtags:**
`#BlackCat #TuxedoCat #CatLover #FelineFriends #GreenEyes #PetPortrait #CatsofInstagram #CuteCat`

***

**Image 2: Kitchen Scene with Wooden Table**

**Short & Sweet:**

* Kitchen vibes.
* Morning prep.
* Rustic kitchen charm.
* Baking dreams.

**Descriptive & Engaging:**

* A cozy, bright kitchen setup ready for culinary adventures.
* Wooden countertops and colorful accents make for the perfect workspace.
* Gathering ingredients for a delicious day.
* The heart of a home kitchen.

**Focusing on the Style:**

* Whimsical watercolor kitchen scene.
* Warm tones and rustic textures in this lovely illustration.

**Hashtags:**
`#KitchenDecor #WatercolorArt #RusticKitchen #Cooking #HomeDecor #KitchenInspo #Foodie #Illustration #CozyVibes`<turn|>
OCR(光學字元辨識)
模型可辨識圖像中的多語言文字。
from PIL import Image
from IPython.display import display
import requests

from transformers import GenerationConfig
config = GenerationConfig.from_pretrained(MODEL_ID)
config.max_new_tokens = 512
gen_kwargs = dict(generation_config=config)

img_url = "https://ai.google.dev/gemma/docs/capabilities/vision/images/cat.png"
input_image = Image.open(requests.get(img_url, stream=True).raw)
display(input_image)

messages = [
    {
        "role": "user", "content": [
            {"type": "image", "url": img_url},
            {"type": "text", "text": "What does the sign say?"}
        ]
    }
]

output = vqa_pipe(messages, return_full_text=False, generate_kwargs=gen_kwargs)
print(output[0]['generated_text'])
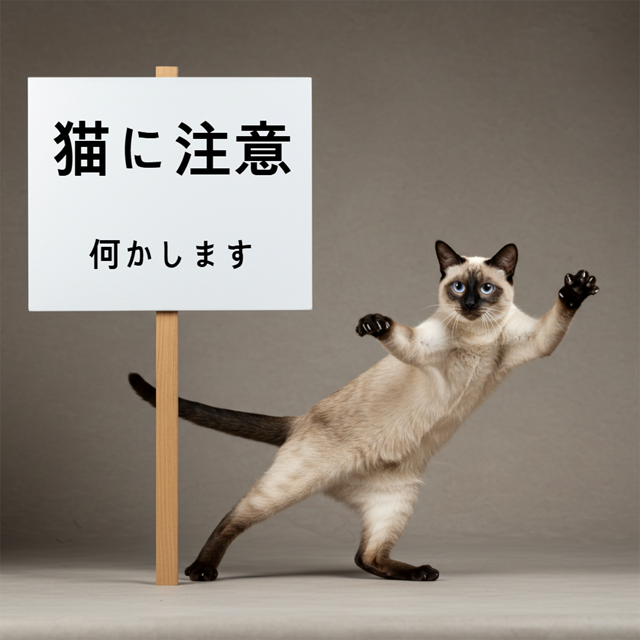
The sign in the image says:

**猫に注意** (Neko ni chūi) - which means **"Caution: Cat"** or **"Beware of cats"**.

Below that, it says:

**何かします** (Nanika shimasu) - which means **"I will do something"** or **"I will do something about it"**.

In the context of the picture (showing a cat playfully jumping), the sign is likely humorous or a lighthearted warning.<turn|>
物件偵測
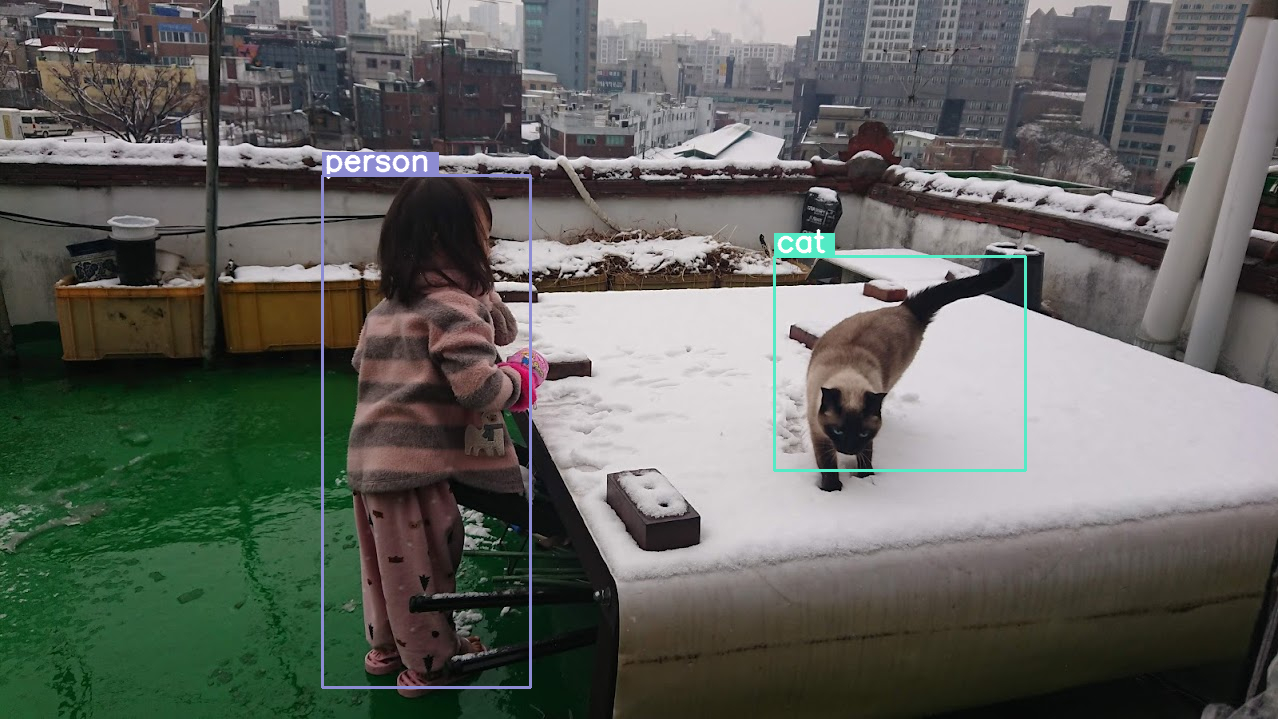
模型經過訓練,可偵測圖像中的物件並取得其邊界框(bounding box)座標。邊界框座標以相對於 1000x1000 網格的正規化值表示。您需要根據原始圖像大小還原這些座標。
import numpy as np
from PIL import Image
from IPython.display import display
import requests

import cv2
import re, json

from transformers import GenerationConfig
config = GenerationConfig.from_pretrained(MODEL_ID)
config.max_new_tokens = 512
gen_kwargs = dict(generation_config=config)

# Load Image
img_url = "https://raw.githubusercontent.com/bebechien/gemma/refs/heads/main/PaliGemma_Demo.JPG"
input_image = Image.open(requests.get(img_url, stream=True).raw)

###############################
# some helper functions below #
###############################

def draw_bounding_box(image, coordinates, label, label_colors, width, height):
    y1, x1, y2, x2 = [int(coord)/1000 for coord in coordinates]
    y1, x1, y2, x2 = map(round, (y1*height, x1*width, y2*height, x2*width))

    text_size, _ = cv2.getTextSize(label, cv2.FONT_HERSHEY_SIMPLEX, 1, 3)
    text_width, text_height = text_size

    text_x = x1 + 2
    text_y = y1 - 5

    font_scale = 1
    label_rect_width = text_width + 8
    label_rect_height = int(text_height * font_scale)

    color = label_colors.get(label, None)
    if color is None:
        color = np.random.randint(0, 256, (3,)).tolist()
        label_colors[label] = color

    cv2.rectangle(image, (x1, y1 - label_rect_height), (x1 + label_rect_width, y1), color, -1)

    thickness = 2
    cv2.putText(image, label, (text_x, text_y), cv2.FONT_HERSHEY_SIMPLEX, font_scale, (255, 255, 255), thickness, cv2.LINE_AA)

    cv2.rectangle(image, (x1, y1), (x2, y2), color, 2)
    return image

def draw_results(text_content):
  match = re.search(r'```json\s+(.*?)\s+```', text_content, re.DOTALL)
  if match:
    json_string = match.group(1)
    # Parse the string into a Python list/object
    data_list = json.loads(json_string)

    labels = []
    label_colors = {}
    output_image = input_image
    output_img = np.array(input_image)

    for item in data_list:
      width = input_image.size[0]
      height = input_image.size[1]

      # Draw bounding boxes on the frame.
      image = cv2.cvtColor(np.array(input_image), cv2.COLOR_RGB2BGR)
      output_img = draw_bounding_box(output_img, item["box_2d"], item["label"], label_colors, width, height)

      output_image = Image.fromarray(output_img)

    return output_image
  else:
    print("No JSON code block found.")


messages = [
    {
        "role": "user", "content": [
            {"type": "image", "url": img_url},
            {"type": "text", "text": "detect person and cat"}
        ]
    }
]

output = vqa_pipe(messages, return_full_text=False, generate_kwargs=gen_kwargs)
print(output[0]['generated_text'])

draw_results(output[0]['generated_text'])
```json
[
  {"box_2d": [243, 252, 956, 415], "label": "person"},
  {"box_2d": [356, 606, 654, 802], "label": "cat"}
]
```<turn|>
可變解析度(詞元預算)
所有 Gemma 4 模型都支援可變解析度,意即可以處理不同解析度的圖像。此外,您可以決定要以較高或較低的解析度處理特定圖像。例如,執行物件偵測時,您可能會希望以較高解析度處理圖像;而影片理解則可使用較低的解析度處理每個影格,以加快推論速度。本質上,這是推論速度與圖像表示準確度之間的權衡。
此選擇由詞元預算控制,詞元預算代表為特定圖像產生的視覺詞元(亦稱為視覺詞元嵌入)的最大數量。
使用者可選擇 70、140、280、560 或 1120 個詞元的預算大小。根據預算,輸入會被調整大小。若預算較高(例如 1120 個詞元),圖像可維持較高解析度,因此需要處理的圖像區塊(patch)會多得多;若預算較低(例如 70 個詞元),圖像需要降採樣,需要處理的區塊則較少。較高的預算(因此有較多詞元)能捕捉到比低預算多得多的資訊。
此預算決定了圖像被調整大小的程度。假設預算為 280 個詞元,則區塊的最大數量為 9 x 280 = 2,520。為什麼要乘以 9?因為在下一步驟中,每 3x3 的相鄰區塊會透過取平均合併為單一嵌入。產生的嵌入即為視覺詞元嵌入。擁有的視覺詞元嵌入越多,能從圖像中擷取的細緻資訊就越多。
讓我們來看看在圖像上執行物件偵測、並將預算大小設得很低(70)時會發生什麼:
import numpy as np
from PIL import Image
import requests, cv2, re, json

from transformers import GenerationConfig
config = GenerationConfig.from_pretrained(MODEL_ID)
config.max_new_tokens = 512
gen_kwargs = dict(generation_config=config)

img_url = "https://huggingface.co/datasets/Xenova/transformers.js-docs/resolve/main/city-streets.jpg"
input_image = Image.open(requests.get(img_url, stream=True).raw)

def draw_bounding_box(image, coordinates, label, label_colors, width, height):
    """Draw a bounding box based on input image and coordinates"""
    y1, x1, y2, x2 = [int(c) / 1000 for c in coordinates]
    y1, x1, y2, x2 = round(y1 * height), round(x1 * width), round(y2 * height), round(x2 * width)

    color = label_colors.setdefault(label, np.random.randint(0, 256, (3,)).tolist())
    text_size = cv2.getTextSize(label, cv2.FONT_HERSHEY_SIMPLEX, 1, 3)[0]

    cv2.rectangle(image, (x1, y1 - text_size[1]), (x1 + text_size[0] + 8, y1), color, -1)
    cv2.putText(image, label, (x1 + 2, y1 - 5), cv2.FONT_HERSHEY_SIMPLEX, 1, (255, 255, 255), 2, cv2.LINE_AA)
    cv2.rectangle(image, (x1, y1), (x2, y2), color, 2)
    return image

def draw_results(text_content):
    """Based on an input image, draw bounding boxes and labels"""
    # Extract JSON
    match = re.search(r'```json\s+(.*?)\s+```', text_content, re.DOTALL)
    if not match:
        print("No JSON code block found.")
        return None

    # Extract data
    data_list = json.loads(match.group(1))
    output_img = np.array(input_image)
    label_colors = {}
    w, h = input_image.size

    # Draw bounding boxes
    for item in data_list:
        output_img = draw_bounding_box(output_img, item["box_2d"], item["label"], label_colors, w, h)

    return Image.fromarray(output_img)


# Detect person, card, and traffic light
messages = [
    {
        "role": "user", "content": [
            {"type": "image", "url": img_url},
             {"type": "text", "text": "detect person and car, output only ```json"}
        ]
     }
]

# Run pipeline and set token budget to 70
vqa_pipe.image_processor.max_soft_tokens = 70
output = vqa_pipe(messages, return_full_text=False, generate_kwargs=gen_kwargs)
print(output[0]['generated_text'])
draw_results(output[0]['generated_text'])
```json
[
  {"box_2d": [454, 871, 533, 923], "label": "person"},
  {"box_2d": [551, 316, 665, 628], "label": "car"}
]
```<turn|>
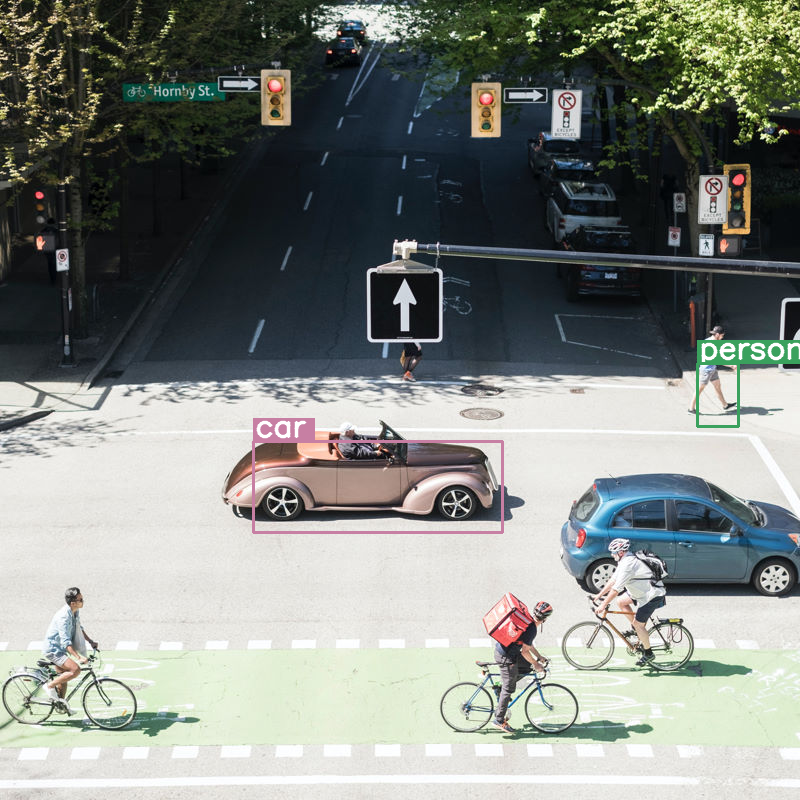
效果還算可以,但顯然圖像被壓縮得很厲害,因為並未偵測到所有的汽車與人物。提高詞元預算應能解決這個問題!
比較詞元預算
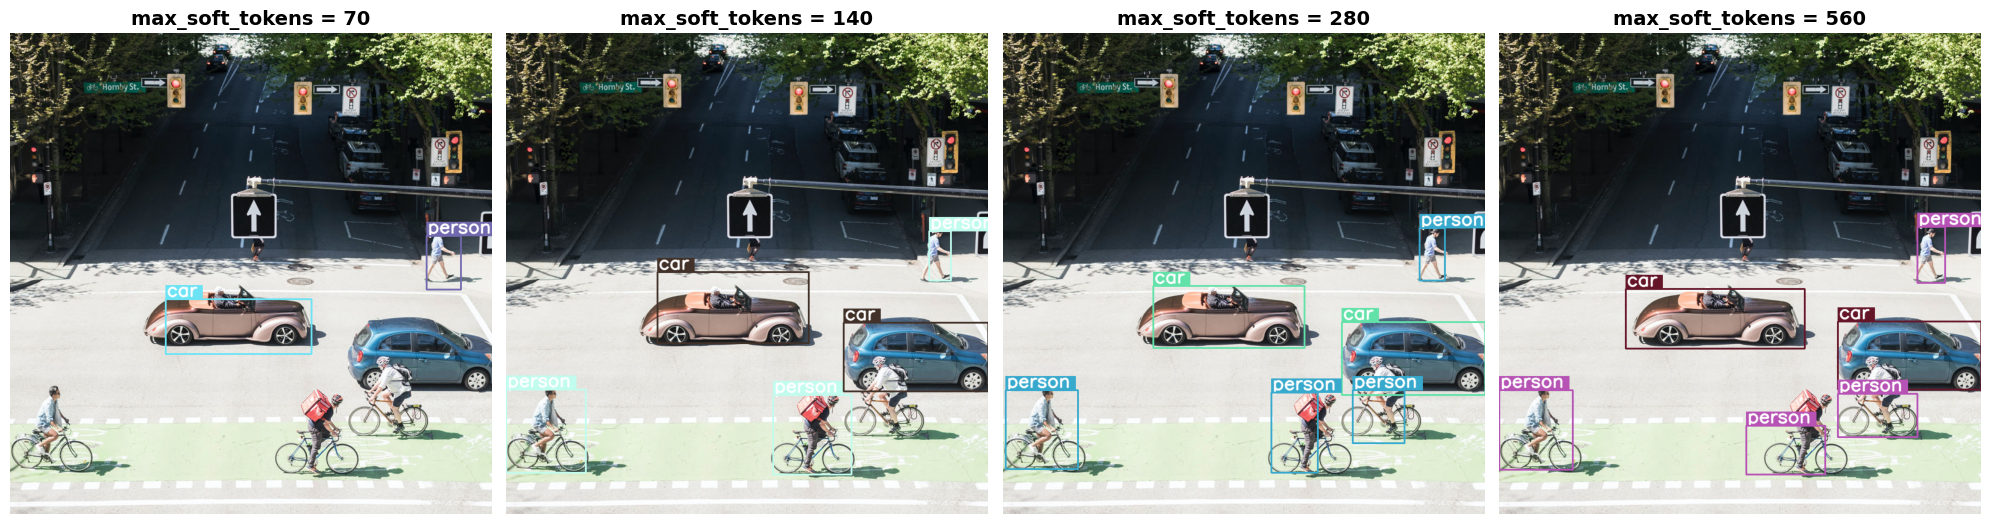
讓我們來看看提高預算大小時會發生什麼!較大的預算會產生並處理更多軟詞元(soft token),這應能改善物件偵測效果。
import matplotlib.pyplot as plt

def count_tokens(processor, tokens):
    input_ids = tokens['input_ids'][0]  # Get input IDs from the tokenizer output

    img_counting = []
    img_count = 0

    aud_counting = []
    aud_count = 0

    for x in input_ids:  # Iterate over the token list
        # Use tokenizer.decode() to convert tokens back to words
        word = processor.decode([x])  # No need to convert to JAX array for decoding

        if x == processor.tokenizer.image_token_id:
            img_count = img_count + 1
        elif x == processor.tokenizer.audio_token_id:
            aud_count = aud_count + 1
        elif x == processor.tokenizer.eoi_token_id:
            img_counting.append(img_count)
            img_count = 0
        elif x == processor.tokenizer.eoa_token_id:
            aud_counting.append(aud_count)
            aud_count = 0

    for item in img_counting:
        print(f"# of Image Tokens: {item}")

    for item in aud_counting:
        print(f"# of Audio Tokens: {item}")

input_image.resize((2000, 2000))

# Detect person and car
messages = [
    {
        "role": "user", "content": [
            {"type": "image", "url": img_url},
             {"type": "text", "text": "detect person and car, output only ```json"}
        ]
     }
]


# Run for different budget sizes
budget_sizes = [70, 140, 280, 560]
# 1120 won't fit on T4, but works on L4 or highger
#budget_sizes = [70, 140, 280, 560, 1120]
results = {}

for budget in budget_sizes:
    print(f"Budget Size: {budget}")
    vqa_pipe.image_processor.max_soft_tokens = budget

    inputs = vqa_pipe.processor.apply_chat_template(messages, tokenize=True, return_dict=True, return_tensors="pt")
    count_tokens(vqa_pipe.processor, inputs)

    output = vqa_pipe(messages, return_full_text=False, generate_kwargs=gen_kwargs)
    result_text = output[0]['generated_text']
    print(output[0]['generated_text'])
    result_image = draw_results(result_text)
    if result_image:
        results[budget] = result_image

# Display side-by-side
fig, axes = plt.subplots(1, len(results), figsize=(5 * len(results), 6))
if len(results) == 1:
    axes = [axes]

for ax, (budget, img) in zip(axes, results.items()):
    ax.imshow(img)
    ax.set_title(f"max_soft_tokens = {budget}", fontsize=14, fontweight='bold')
    ax.axis('off')

plt.tight_layout()
plt.show()
Budget Size: 70
# of Image Tokens: 64
[transformers] You seem to be using the pipelines sequentially on GPU. In order to maximize efficiency please use a dataset
```json
[
  {"box_2d": [423, 864, 534, 935], "label": "person"},
  {"box_2d": [554, 323, 667, 625], "label": "car"}
]
```<turn|>
Budget Size: 140
# of Image Tokens: 121
```json
[
  {"box_2d": [498, 314, 645, 628], "label": "car"},
  {"box_2d": [753, 554, 917, 716], "label": "person"},
  {"box_2d": [741, 0, 914, 165], "label": "person"},
  {"box_2d": [602, 700, 745, 1000], "label": "car"},
  {"box_2d": [413, 877, 515, 922], "label": "person"}
]
```<turn|>
Budget Size: 280
# of Image Tokens: 256
```json
[
  {"box_2d": [526, 311, 655, 625], "label": "car"},
  {"box_2d": [601, 702, 752, 1000], "label": "car"},
  {"box_2d": [742, 725, 853, 833], "label": "person"},
  {"box_2d": [747, 556, 914, 653], "label": "person"},
  {"box_2d": [743, 5, 906, 155], "label": "person"},
  {"box_2d": [406, 864, 515, 916], "label": "person"}
]
```<turn|>
Budget Size: 560
# of Image Tokens: 529
```json
[
  {"box_2d": [533, 263, 656, 634], "label": "car"},
  {"box_2d": [742, 0, 908, 153], "label": "person"},
  {"box_2d": [816, 512, 917, 676], "label": "person"},
  {"box_2d": [600, 703, 741, 1000], "label": "car"},
  {"box_2d": [750, 703, 840, 867], "label": "person"},
  {"box_2d": [404, 867, 520, 925], "label": "person"}
]
```<turn|>
摘要
在本指南中,您學會了如何將 Gemma 4 模型用於圖像理解任務。範例涵蓋了從圖像產生文字、使用提示範本進行視覺問答、同時處理多張圖像、光學字元辨識(OCR)、使用邊界框的物件偵測,以及使用詞元預算管理可變解析度。